
Altenew Sneak peeks Galore + VIDEO!!
Hi and welcome back to my blog!
I have a video and a handful of cards to show you today, and I am mixing and matching some older Altenew products with some brand new, very exciting products! These will be available in the Altenew shop on Feb 5th so mark your calendars!

The first products are two new widths of the absolute must-have Instant Dimension Foam Tape. There will be an Instant Dimension Foam Tape 1” width and an Instant Dimension Foam Tape 1/4” width to choose from, alongside the original Instant Dimension Foam Tape 1/2” width. These are all 1/16th” height, which is a good height BUT if you like higher tape, there will also be Instant Dimension Foam Tape available in 1/8” height, in 1/4 inch width AND ½ inch width.
I have a video on my YouTube channel showing these two off, as well as showing the amazing results of the brand new Shimmer Relief Pastes, that will also be available on Feb 5th! I have used Enchanted Gold and Antique Silver on my cards.
On this card, I have used one of my favourite stencils from 2024, Stencil Art: Nature Splashes with the Tranquility Fresh Dye Ink Bundle, which so happens to be my favourite blue ink family. I used the Antique Silver Shimmer Relief Paste with stencil no5 to add some details to the panel, before cutting it up and layering it up with Instant Dimension Foam Tape.
This one I layered up on top of a background of Dark Night coloured card stock from Altenew, and then it’s finished off with a stacked You Are Loved word diecut.
This green and gold background got chopped up, and then puzzled back together with different heights thanks to that fab foam tape. I used the same You Are Loved word diecut, but this one got a spot of colour added by ink blending Parrot ink in an ombré fashion.
Here are the four backgrounds before any sentiments had been added. Each one has a little something that makes it unique, and I like that.
I hope you get a chance to check out the video, it’s a very long one so I would recommend you getting a snack, use the bathroom before you sit down and settle in.
Down below you can find compensated affiliate links to the products I have used in the video at no extra cost to you. If you shop using these links, I get a small commission from Altenew directly as a thank you for directing you to them. This is how I earn a little bit of money to help cover costs like website hosting, filming equipment and therapy to bring me down from the insanity that dealing with technology bring on, LOL.
As always, with creativity, sparkle and light, especially in these dark times. Big hugs and lots of love from Erica
Altenew shop
Fresh Dye Ink Bundle Tranquility
Fresh Dye Ink Bundle Tropical Forest
Stencil Art: Nature Splashes stencils
Scattered Tiles Stencils
Small Blending Brush set (Flat Bristles)
Detailed Blending Brush set (Angled Bristles)
You Are Loved word diecut
Metallic Watercolors 14 pan set
Instant Dimension Foam Tape 1”wide
Instant Dimension Foam Tape /2” wide
Instant Dimension Foam Tape 1/4” wide
Shimmer Relief Paste bundle
Shimmer Relief Paste Enchanted Gold
Shimmer Relief Paste Antique Silver
Dark Night colored cardstock
Brushed Gold Metallic Cardstock

ALtenew Dye-Licious Instagram hop and a Video!
Hi!
Today I’m just popping in really quickly to let you know there is an Instagram hop going on. Altenew has a range of gorgeous inks in all colours and shades, and that is definitely something worth celebrating. I love colours and use them generously on most of my projects. A Clean And Simple style of gal I am not… Apparently a bit of Yoda I do have in me though.

I have used the aptly named Sugar Rush product suite for two cards, and I have a YouTube video for these too over on my channel.
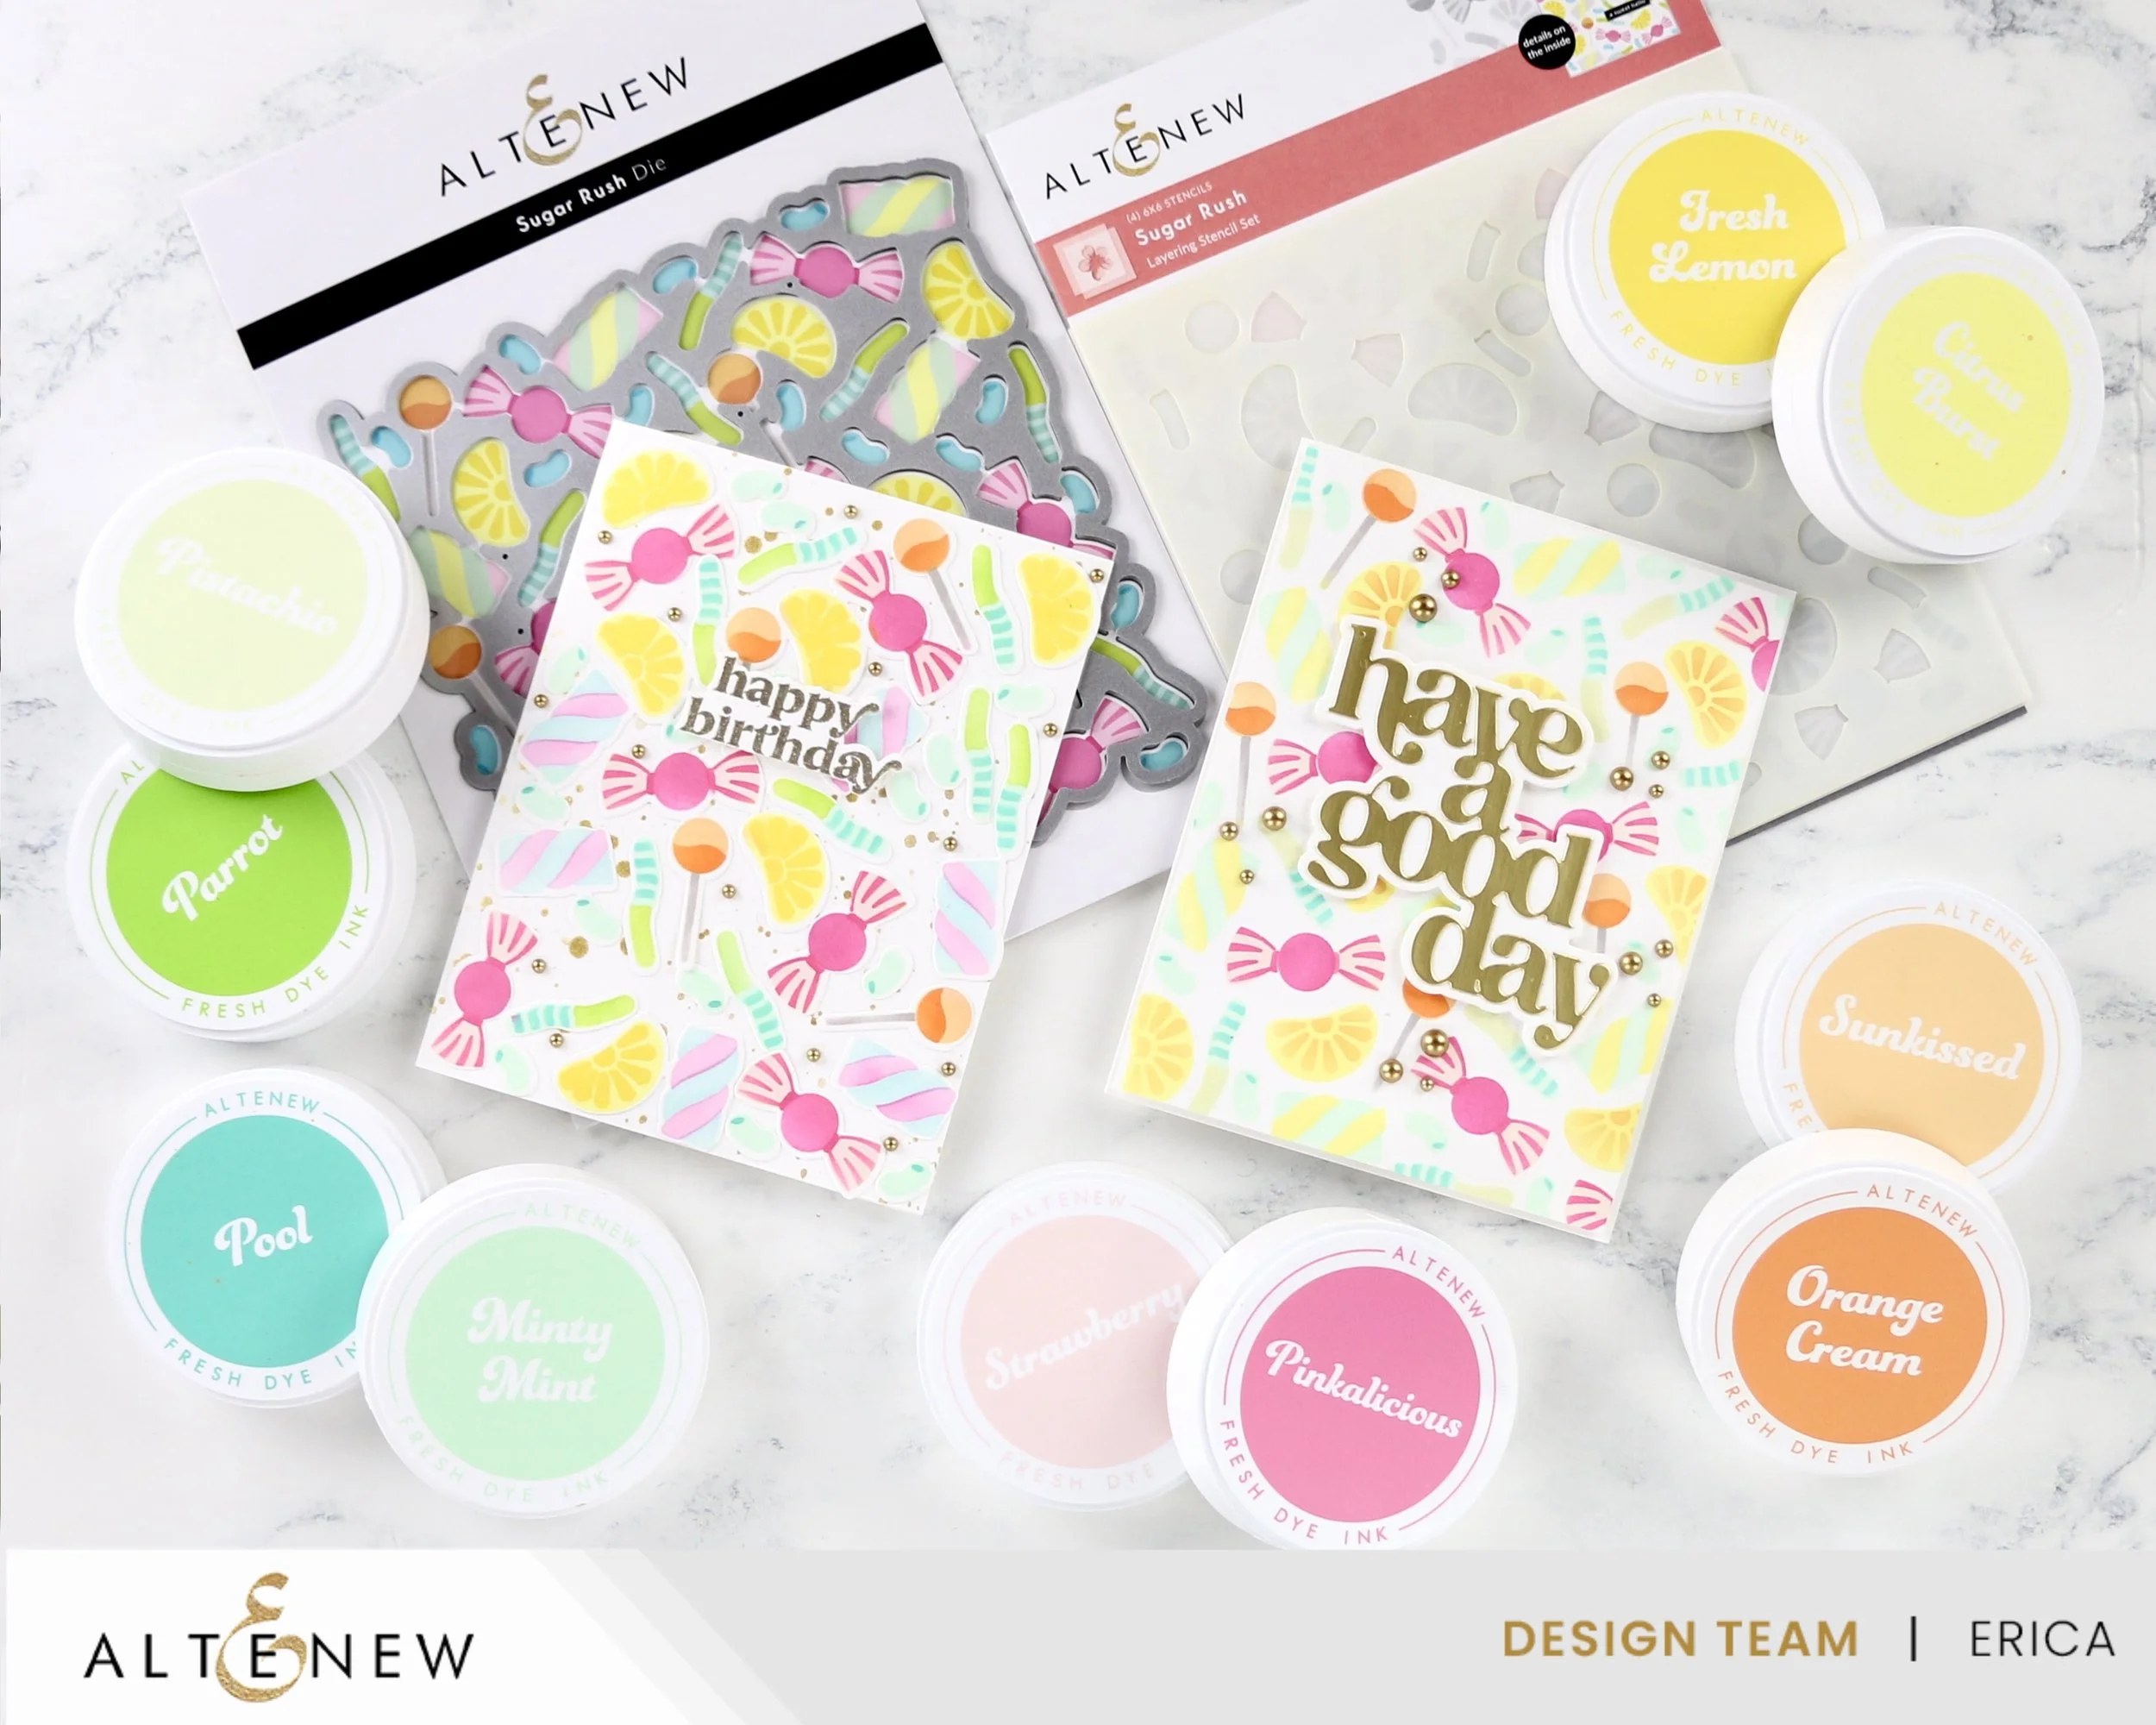
The Sugar Rush suite consists of layering stencils and a coordinating diecut, and I have used SO. MANY. INKS to make these colourful cards! I have also used so many different ink blending tools, like the small flat bristled ones to the mini angled brushes ones.

At the risk of being a one-trick-pony, I have used the Timeless Sentiment 2 diecut set for one of the cards. It is one of my favourites, after all so hey, don’t come for me.
For this ‘have a good day’ I used white card stock for the shadow part and Brushed Gold Metallic card stock for the actual words. This is popped up with a bit of Instant Dimension Foam Tape for extra dimension.
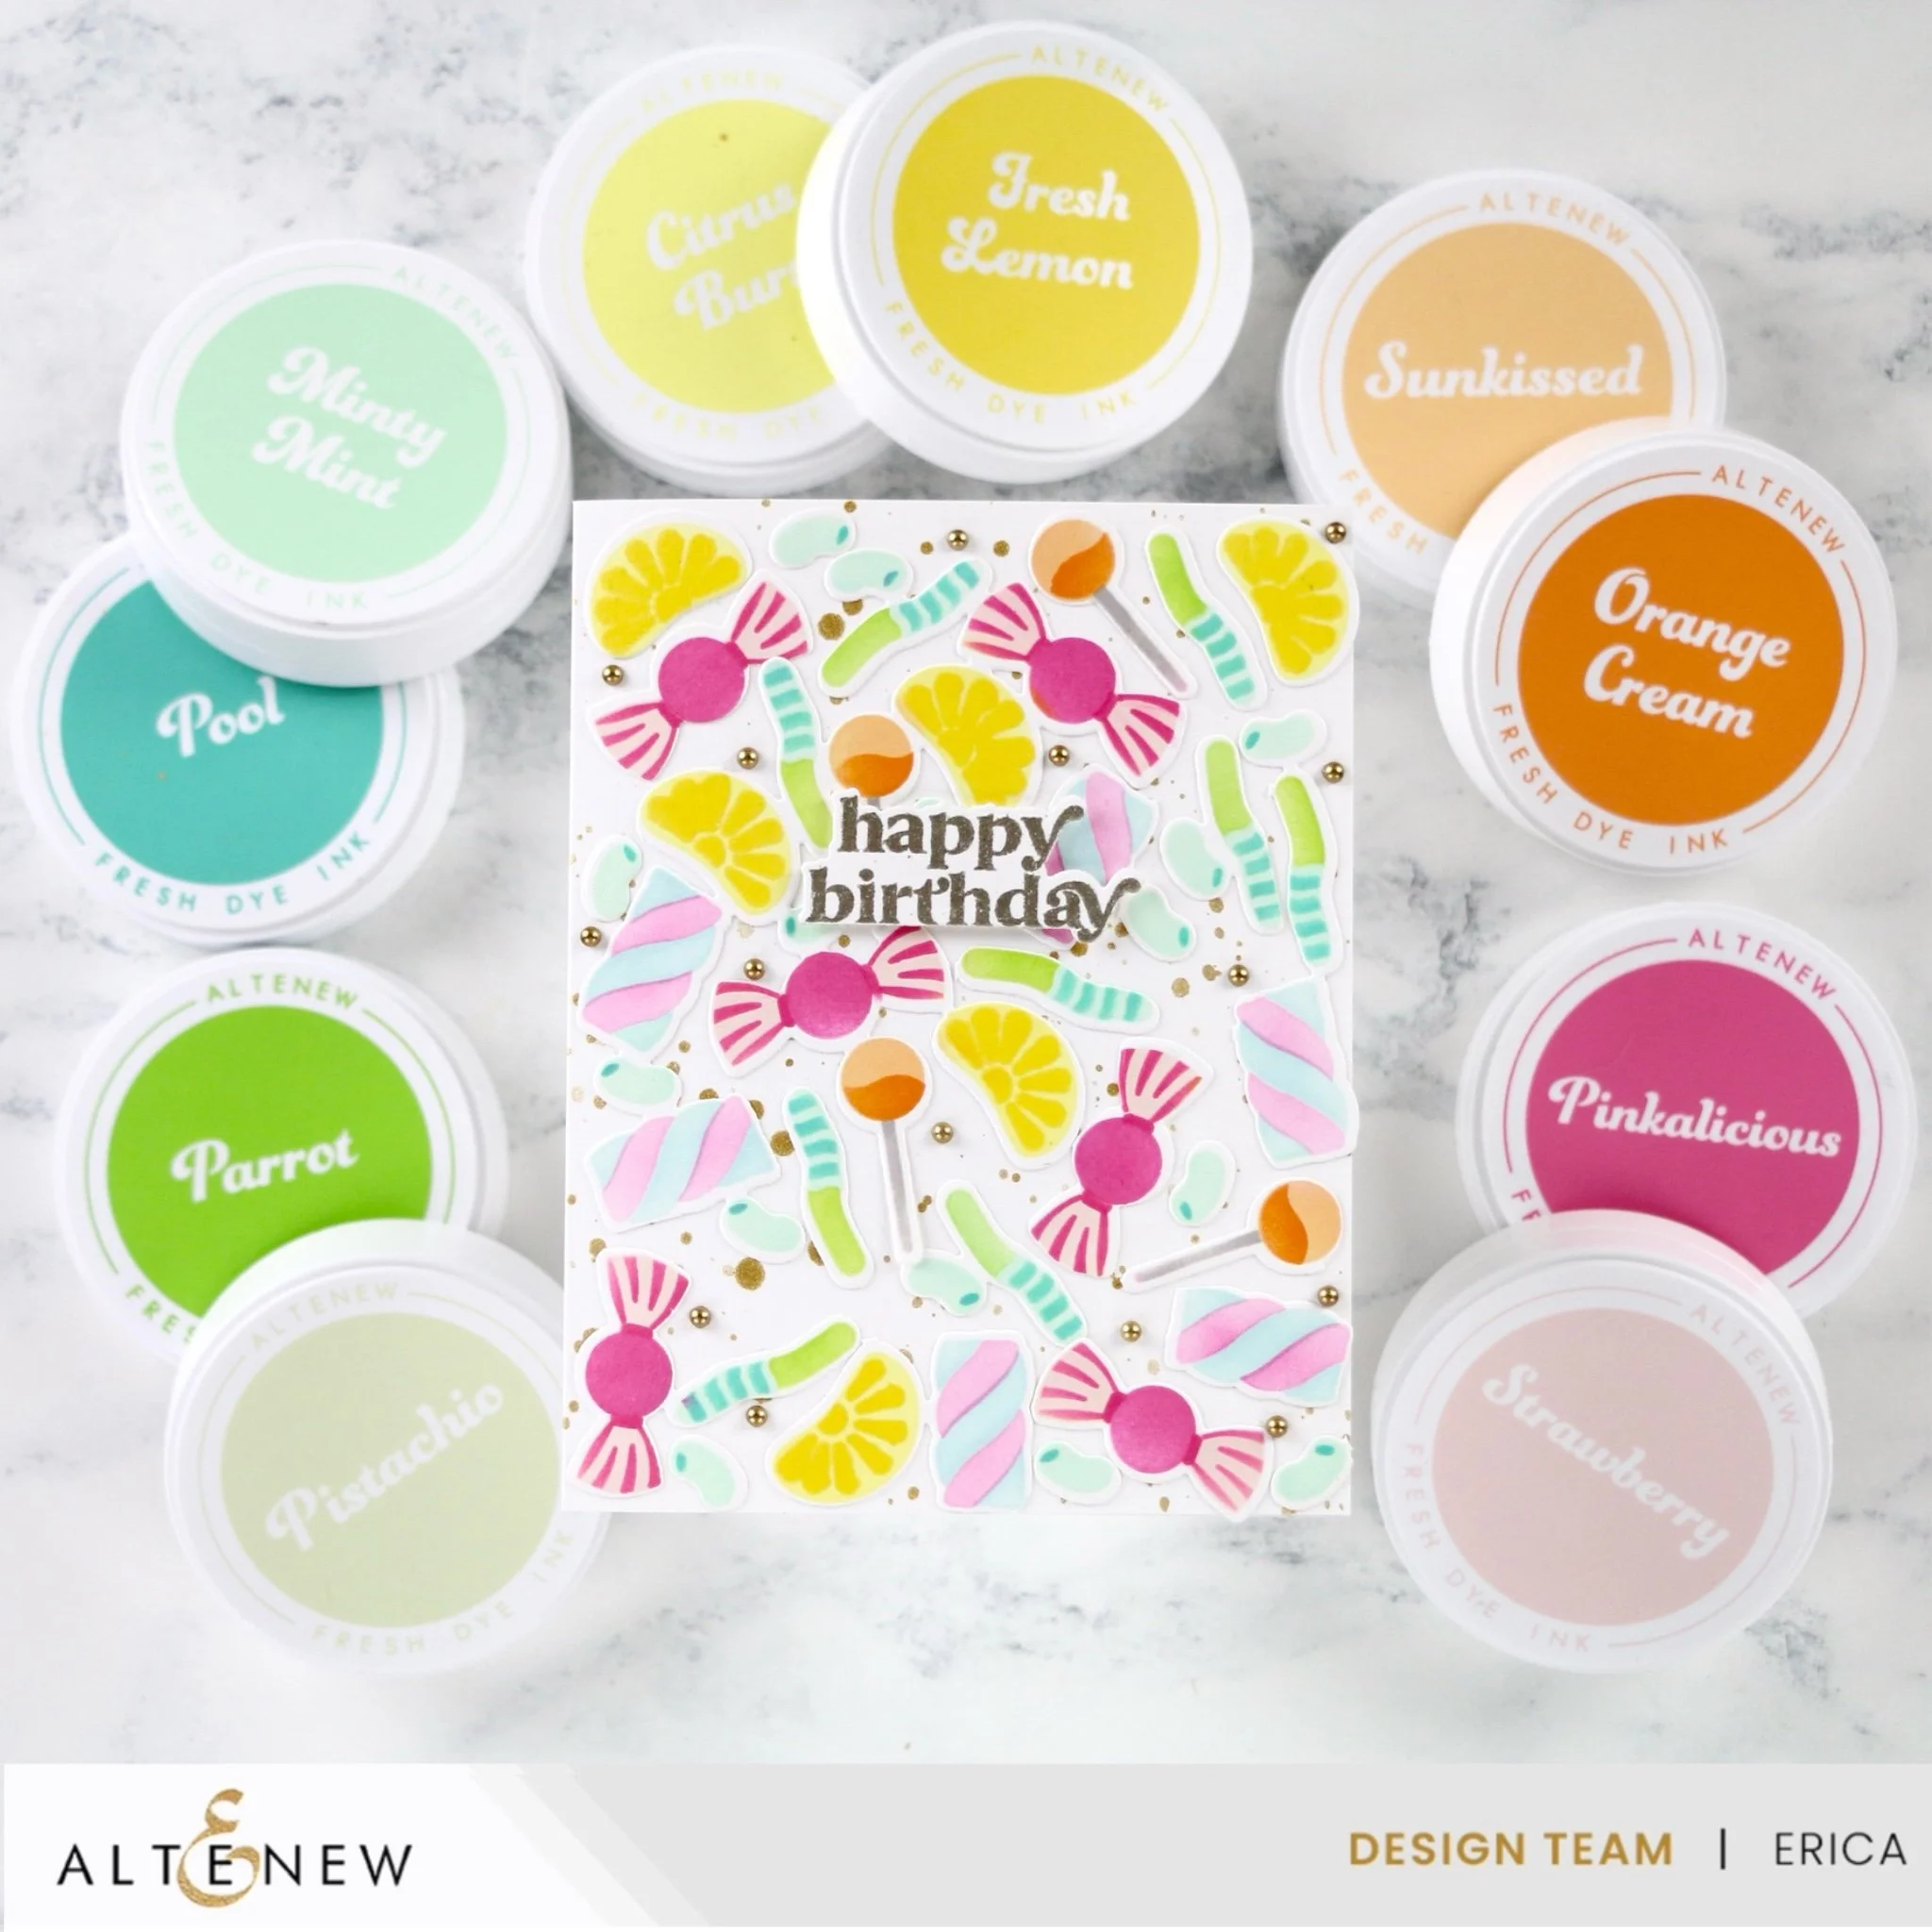
This is actually images from the first ink blending I did, but I wasn’t 100% happy with how it turned out so I decided to use the coordinating diecut to cut out the bits that had bled. I ended up with enough pieces leftover to cover a whole card base, so that’s what I did.
This one has some gold water colour splatters on it too, from the Metallic Watercolor 14 pan set, and I think it adds just enough to make the background a bit interesting. On this one I also added some Satin Gold Pearl Dots and a heat embossed sentiment from Pocket Sentiments.
The giveaway has already concluded so ignore all of that, and focus on the card making in the video. I hope you enjoy it!

That’s it from me for today, thank you so much for stopping by and don’t forget to join in the Instagram hop for your chance to win some prizes!

Altenew are also running a deal right now, where you can pre-order the Shimmer Relief Paste bundle and get a free gift (applies only to the first 100 orders though so be quick!) and these luscious products are launching on Feb 5th!
I have used compensated affiliate links to Altenew in this post. If you shop using these links I get a small commission directly from Altenew at no extra cost to you, whatsoever! This is their way of thanking me for endorsing their products and spreading inspiration all over the place like glitter and confetti! The earnings I get from these links help me pay for things like hosting this website, firewalls and VPN for protection, and all the usual stuff like filming equipment and so much glue…
Thank you so much if you choose to support me by shopping with these links. It really means the world to me and I’m so grateful!
With love and light, sparkle and creativity from Erica

Pinkfresh Studio January Release Beautiful Life
Hi and welcome to the first blog post of 2025!
I am starting the year with some absolutely thrilling news! I will be part of the Pinkfresh Studio design team for the first half of the year, and I’m so happy about it!
To see my picture amongst all of this talent is such a dream come true!
Today is release day for Pinkfresh Studio, the first of 2025 and it’s called Beautiful Life. Which I think is such a great name for the first release of the year, it sets a hopeful outlook for us.

This year we are not doing blog hops for the releases anymore, but I thought I’d pop in here and share that with you all as not everyone is on Instagram. That is where we will be doing release hops and giveaways now, and speaking of giveaways: If you comment on the Pinkfresh Studio Instagram post you can win the whole shebang! Yep, the entire release. (insert mind blown sounds here)
Something else that is different is that the usual ten $25 gift cards are now ten FIFTY DOLLAR gift cards!!

If you are not already on Instagram, sign up now and follow me and Pinkfresh Studio for your chance to win some of these generous prizes!
The photo below is my profile picture, so you can check you are in the right spot.

Now for my card, I have used the beautiful Butterflies In Bloom product suite, which has a Press Plate, stamp set, coordinating diecut and coordinating layering stencils.


The only product I didn’t use was the stamp set, and I have more cards to share later in the week. If you don’t want to letterpress or hot foil, the stamp set is for you for sure.

I hot foiled the image in Gold first, and then used the coordinating layering stencils to add some soft colours to it. Once that was done, I cut it out using the coordinating diecut.

I do love a bit of texture and interest to a background, and for this card I used the Stitched Chains Cover Plate. Before running it through my die cutting machine I rubbed some Espresso ink over it to add even more interest to the background.
I also used one of the Essentials: Blanket Stitch Brackets dies on the panel to create even more interest. One of the pieces I have propped up with Instant Dimension Foam Tape from Altenew.

Final touches were a hot foiled sentiment from the Butterflies In Blooms Press Plate set, and I have stacked this with two more pieces. A little smattering of bling was absolutely needed and I used Espresso gems.

That’s it card making wise, but I thought I’d just mention that I have used compensated affiliate links in this post. What that means is that if you click on any of these links and actually buy something, I get a small commission from the company directly. In this case, Pinkfresh Studio and Altenew, AT NO EXTRA COST TO YOU!! Yes, that’s right. This is one of the ways you can support me as a creator if you shop. It never costs you anything extra, but it shows the companies I work with that I bring traffic and orders to them. Which in turn makes them more likely to keep me on their design team, and most importantly, it helps me make some money so I can become financially independent and support my little family. Thank you so much if you shop using my links, I really, really appreciate it more than you will ever know.

If you are looking for some great slimline dies to add to your collection, there is currently 50% OFF the dies in this section!

There is also the CLEARANCE section where you can find all sorts of amazing products at great discounts. These are likely to be discontinued once sold out so if you see something you want, don’t delay. As they say, you snooze, you loose.

If this is the year for you to start scrapbooking and putting those memories into albums, this deal might interest you and give you that kick start to actually start your holiday scrapbook: Holiday Magic Scrapbook Bundle with Linen Album

For qualifying orders, you also get a free gift while supplies last! That Abstract Triangles hot foil plate has been a favourite of mine since it was released and I’m so sad it’s been discontinued.
Right, now I really am done, but thank you if you made it this far! Down below I have linked the products I used, except for the inks and blending tools, with compensated affiliate links.
With love and light, sparkle and creativity
Erica


Pinkfresh December release Gentle Greetings & Greenery | Giveaway and Video!
Hi and welcome to the last Pinkfresh Studio release of 2024!
Wow, this year has absolutely FLOWN by, I can’t believe it is almost over already. So much happened this year, so many life lessons have been learnt, they have both been suffered through as well as empowered me. It’s been a year of self discovery, growth and so many ups and down. Life, eh? I can’t wait to see what 2025 has in store. Thank you for coming to my TED talk, by the way!
Ok, now to what we are really here for: Pinkfresh Studio’s December release, which is called Gentle Greetings & Greenery! I am one of the stops of a celebratory blog hop, you can find the whole lineup via the inLinkz link here and if you came here from the talented Enza Gudor you are in the right spot! The next stop on the hop is the amazing Heather Hoffman. If you come across any broken links, the whole line up can also be found on the Pinkfresh Studio blog post.

It wouldn't be a celebration without a generous giveaway, and this is no different! You can win THE ENTIRE RELEASE, yes, you read that right! You can actually win the whole shebang by commenting on the Pinkfresh release blog post, and you can double that chance by commenting on the Pinkfresh release YouTube video. If you hop along with us here on the blogs, and leave comments, there are TEN $25 gift cards to the Pinkfresh Studio shop that will be given to ten randomly drawn lucky people.
The winners will be announced on the Pinkfresh GIVEAWAY page on Dec 18th 2024, make sure to keep an eye on that page and claim your prize within two weeks!
I only have one card to share with you today BUT I also have a YouTube video for it, so I hope that makes up for it. You can find the video HERE, or click on the thumbnail down below. If you haven’t already done so, make sure to subscribe to my channel!
I have used the Fresh Herbs product suite, and it comes with a stamp set, coordinating layering stencils and coordinating diecuts.


I wanted my herbs to look quite natural so I have stamped the outline stamp up with Sage ink for one of them and Eucalyptus on a second panel. I wanted to make a really nice and big herb bucket. I have used the same two inks for the layering stencils, plus a touch of Limoncello and Lush Forest.
After I finished ink blending all of my herbs, I used the coordinating diecuts to cut them all out and put them aside for now.

For the bucket I have used Misty Coast, Rocky Slope and Metropolis to create a vintage look. In the video I and also sharing a few tips and tricks on how to get that optical illusion of the bucket being more 3D than 2D. Having the 1/2” Blending Brushes help with these smaller details!

I added Doe ink to the handles, and I tried to get that wood grain look to it by dragging my blending brush rather than going in circles but it wasn’t working. What I should have done was go for a darker colour, like Espresso, rather than do what I did… I grabbed a couple of Copic markers, and attempted (note the word ATTEMPTED) to create that wood grain look but meh…I think it botched the whole look.
For the little sign diecut I used the Copics again and it worked much better this way, and it was probably because I tried adding the Copics to the handles while the stencil was still in place. That just did not work!
I stamped up ‘sending love’ from the Fresh Herbs stamp set with Metropolis ink and then it was done.

I have also used the Interlaced Diamonds diecut for my background. It’s meant to look like vintage wrought iron trellis, to go with my vintage bucket. To get the look I first ink blended a bit of Rocky Slope on a piece of card stock and then I dragged the Metropolis ink pad onto it directly. When this was done I ran it through my diecutting machine and poked out the negative bits. The Interlaced Diamond panel was then glued down directly onto a card base, and then I arranged my herb bucket on top.

I really like how this came out and I had such a great time putting it together! If only gardening and growing herbs was this fast in real life, I would have fresh basil pesto every day, lol!
That’s it from me for today, I really hope you enjoyed this post and get a chance to watch the video too. Don’t forget to hop along with the rest of the hop and to leave those comments on the Pinkfresh Studio posts, that’s where the big grand prize winners will be drawn from! Good luck and happy hopping!

Lots of love and light, creativity and sparkle from Erica

Pinkfresh Studio “Essentials” Release Blog Hop
Hi and welcome back to a stop on a fabulous blog hop!
Today we are celebrating the Pinkfresh Studio November Essentials release, and like the name indicates, it’s pretty essential stuff in this release. Lots of diecuts to add those delicious details and texture, the staples of card making.

If you came here from the talented Emily Midgett you are on the right track, and the next stop on the hop is the amazing Heather Hoffman! The full hop list can be found in the InLinkz link down below.
There is a generous giveaway too, as it’s a celebration. You can win the ENTIRE release by commenting on the Pinkfresh Release blog post, and you have another chance to win the entire release by commenting on the release YouTube video too. There are also TEN $25 give cards to the Pinkfresh Studio shop up for grabs, and the winners of these will be drawn from the comments on the stops along the hop.
Winners will be announced on the Pinkfresh GIVEAWAY PAGE on November 13th. Make sure to check the announcement, and claim your prize within 2 weeks if you are one of the lucky ones!

For my card I have used the Nested Rectangles Diagonal Stitch along with the Fancy Edgers dies. There was one of the patterns that grabbed me right away!
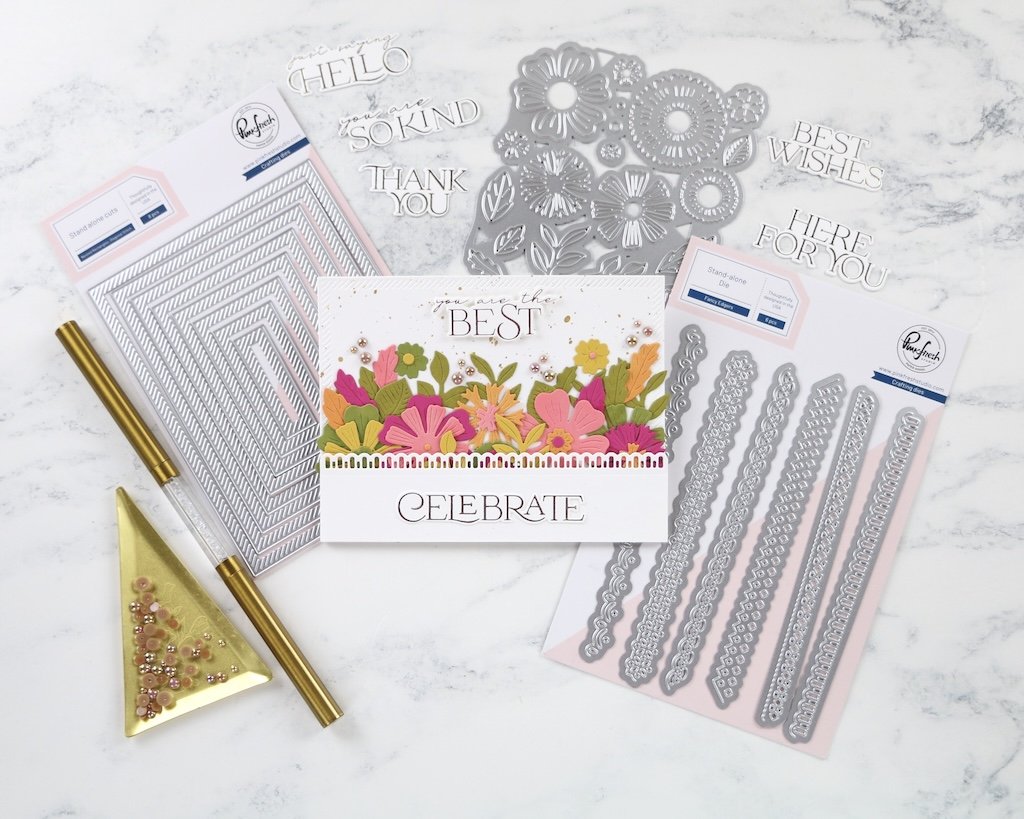
I had the idea to make a flower box sort of, and I have a slight obsession with the Garden Party dies from a few releases ago… I love them!

I had so much fun putting this together, and I made a video too! You can find that over on my YouTube channel, if you want to check it out.
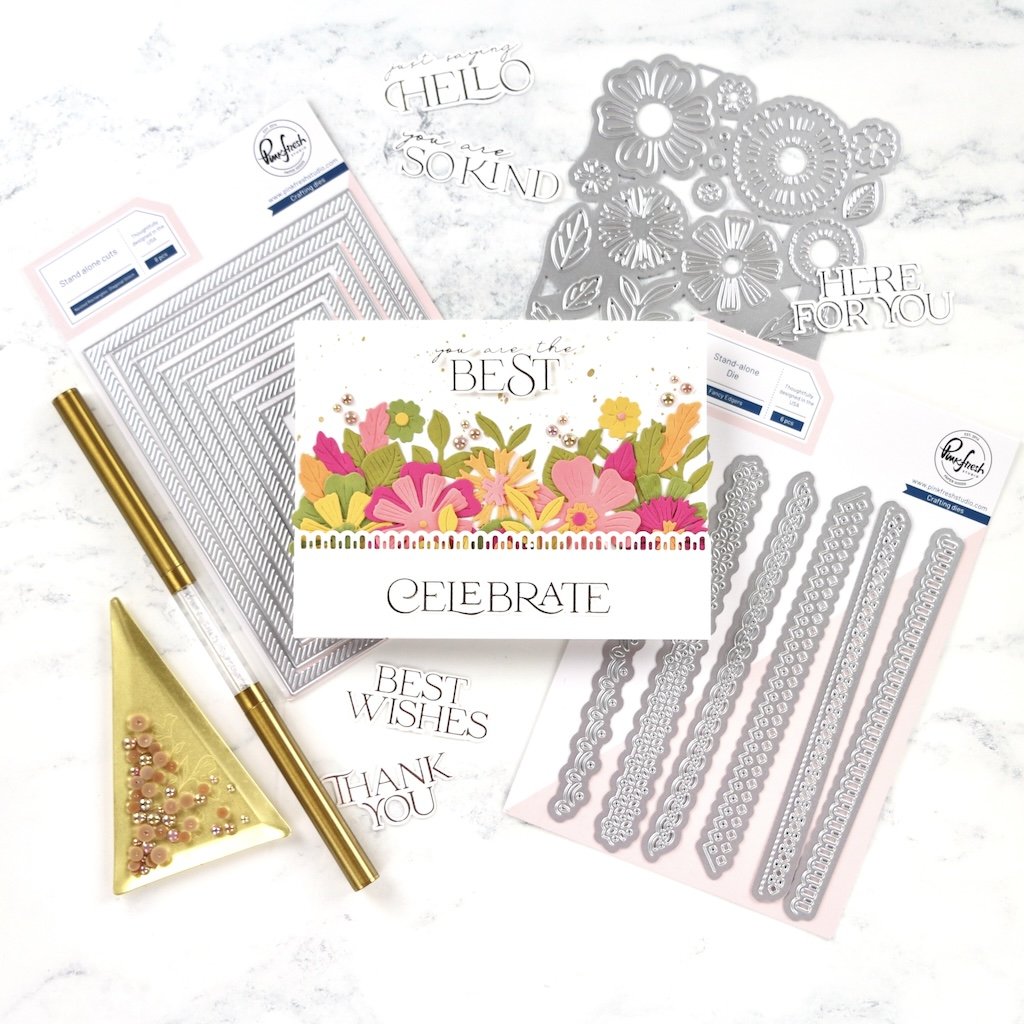
I finished the card off with some Metallic Pearls Matte Gold and some fabulous sentiments from the Here For you suite. I hot foiled the sentiments with the Press Plates, and then used the coordinating diecut to cut them out.

That’s it from me for today, short and sweet! Thank you so much for stopping by and enjoy the rest of the hop!
With love and light, creativity and sparkle,
Erica

Pinkfresh Studio “Kindness in Bloom” Release Blog Hop + GIVEAWAY!!
Hello October and welcome to my blog!
Today I’m hopping along with Pinkfresh Studio and friends to celebrate the beautiful Kindness In Bloom collection being released! There is a blog hop today, and Instagram hop tomorrow Wednesday 9th of October. Both of these hops offer chances to win some FANTASTIC prizes so make sure to check them out.

I have a few cards to show you today, and I also made A YOUTUBE VIDEO! You can check that out over on YouTube, and don’t forget to subscribe to my channel if you are not already a subscriber.

One of the cards is only shown in the video, the actual making of it is not shown in the video itself but you can see it in the photo above and below.

For my cards I have focused on the beautiful Always Smiling product suite. It comes with a stamp set, a Press Plate, coordinating layering stencils and of course, a coordinating diecut set.


For my first card I have used the Always Smiling Press Plate and the BetterPress system. I don’t actually have a black ink pad from Pinkfresh Studio, so I used Licorice, which worked great!
To add colour I used the coordinating layering stencils and inks in Cherry Blossom, Peony, Hydrangea, Sage and Eucalyptus. I went quite light with the ink blending for a soft look, and love how it turned out.

To add some interest and texture to the card, I have used the coordinating diecut on the panel, as well as cut out another two pieces that I stacked up with some liquid glue.
I have also cut out the Dotted Fancy Frame, the biggest one, out of black and white card stock. These are also stacked to add some dimension. The sentiment is also stacked… of course!

I have also used the Press Plate as hot foil plates, with Matte Gold and Champagne foil. For both of these panels I have used the same ink colours, but with different results. One the panel with Matte Gold foil, I have gone very soft and dreamy, almost gone for a pastel look.

The ink colours used with the coordinating layering stencils can be seen in the photo.
On this card I have also used the coordinating diecut to cut out the image, as well as the sentiment. I thought I was going to use a gold Fancy Rectangle Frames diecut on this, but I ended up using the ‘leftover’ rectangle instead.

I finished this one off with some gorgeous Clear Drops Iridescent. The gold block behind the floral image really makes it pop, don’t you think?
The Champagne panel was trimmed down with the Blanket Stitch Octagon diecut, just to add some interest, before adding this to a card base.
Embellishment wise I have gone simple with the Glitter Drops in Gold, and they were the perfect little finishing touch.
My final card has all my favourite techniques and bits on it: Heat embossing, rainbow ink blending, layers and texture, and of course BLING!
If you want to learn how to do this sort of rainbow ombrè ink blending, make sure to check out the YouTube video. I show you how to do it, and talk tips and tricks.

I would love to hear which one of these is your favourite, and seeing as a comment counts as an entry for one of those $25 gift cards, why not let me know?
Now it’s time to hop along the rest of the hop and the next stop is the amazing Heather Hoffman!! If you find any broken links along the hop, check out the full list via the inLinkz list here, below or the post on the Pinkfresh blog.

Thank you again for stopping by, and for hanging in there. I know this was a bit of a long one, so yay for still being here. A big cookie for you!!
Lots of love and light, sparkle and creativity,
Erica

Pinkfresh Studio “Here for You” Release Blog Hop
Today I am blog hopping with Pinkfresh Studio to celebrate the August release, which was a bit delayed, hence why it's now in September.
Hi, hello, hola!
I’m so excited to be part of the Pinkfresh August release hop, and yes, we know it’s September but let’s just roll with it.

A celebration isn't complete without a fabulous giveaway, and there is one here! We will be giving away the full release on the Pinkfresh blog & YouTube channel. You will have to comment on the release video and the blog post in order to be in with a chance, though.
We will also be giving away a total of TEN $25 gift cards along the hop. As per usual with blog hops - the winners will be picked from the comments, so the more you hop and comment, the bigger your chance to win.
Pinkfresh will pull the winners & post them on September 18, 2024 on the GIVEAWAY PAGE. Please make sure to check that page & claim your prize within 2 weeks, if you are a winner.

For my first card I have used the lovely Art Deco Floral Arch suite. It comes with a Press Plate, a rubber stamp, a coordinating diecut and layering stencils.
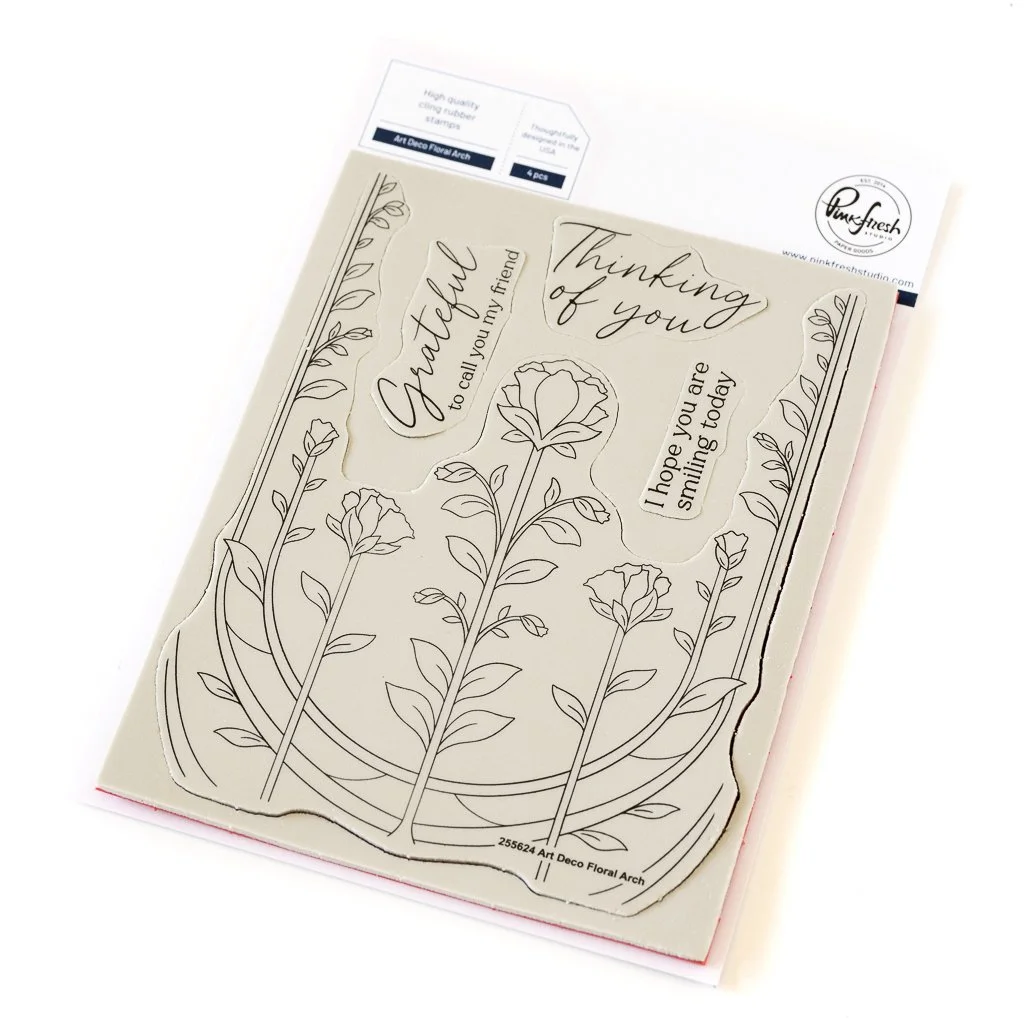

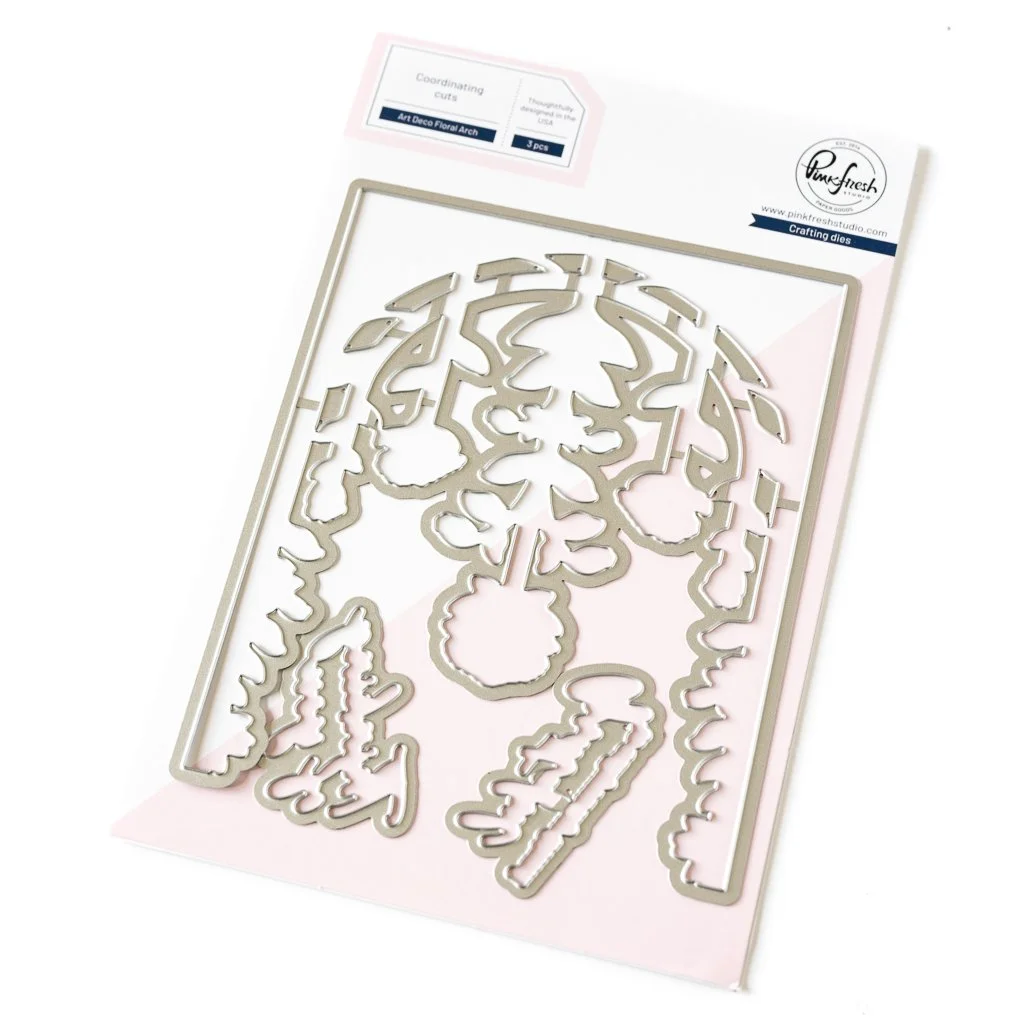

I heat embossed the stamp set with Gold embossing powder from WOW! Embossing, and then ink blended with the coordinating layering stencils.
The colours I used are Cherry Blossom and Mulberry Blush for the florals, and Limoncello plus a touch of Citron for the leaves and stems. I used one of the brand new bigger ink blending tools too! Oooooh, let me tell you, I’m a fan!

I used a little bit of Espresso and Gathered Twigs on the arches too. With the ink blending done, I used the coordinating diecut to cut out the image.


Sentiment wise it made so much sense to use the GORGEOUS set called Here For You, also in this release. It has a stamp set, press plates and diecuts. I decided to heat emboss the stamps in Gold again, to keep things cohesive.
The fact that even the sentiments have coordinating diecuts is something that I absolutely LOVE. It looks so clean and elegant cut out with clean lines.

On the back of the floral image I added lots of foam tape strips to elevate it from the background, that I used the Charming Stitched Florals cover plate on.
I had to add a few little sparkles too. Duh. Of course I did! These are the Champagne Glitter Drops and they were perfect.
My second card is using the same Art Deco Floral Arch suite, only this time I hot foiled the Press Plate with Matte Gold hot foil!

I also kept the colour scheme super simple with just THREE colours! Sunshine for the arches, Grassy Knoll for the leaves and stems, and finally Bubble Gum for the florals.
This image I also cut out using the coordinating diecut, but I skipped the foam tape for this one, rather opting to glue it down directly onto a card base.

I added a hot foiled sentiment from the set to the card, and a generous sprinkling of Glacier gems later, this one was done! With that, I’m done for today but don’t forget to hop along and leave comments for your chance to win either a $25 gift card or the entire release bundle!! Look at all of these goodies!
The next stop on the hop is my in-real-life friend, the amazing Heather Hoffman and if you came here from Emily, you are already on your way!
With love and light, sparkle and creativity,
Erica

Pinkfresh Studio Magical Holiday Release Blog Hop + GIVEAWAY
Hi and welcome to a, to me, very exciting post!
Today I am blog hopping with the Pinkfresh Design Team and friends to celebrate the July release! It’s my first blog hop with the team since joining back up after a hiatus!

There is a fantastic lineup of amazing projects in the hop so make sure to stop by all the designers to see what magic they have created. If you leave comments on the stops along the hop you will also be in with a chance to win one of TEN $25 gift cards to the Pinkfresh Studio shop! If you leave a comment on the blog post on the Pinkfresh Studio blog, you will be entered into a draw where the winner will win THE ENTRIE SHEBANG of the release!!
Winners will be announced on the Pinkfresh Winner page on August 13th, so make sure to mark the date and check the page to see if you are the winner!

For my two cards I have used the lovely Magical Holiday Press Plate suite. It has a Press Plate, which is also hot foil compatible! There is a stamp set, a layering stencil set and also coordinating diecuts available.


I hot foiled a couple of panels with the Press Plate, including a sentiment from the set, using Aura Hot Foil on one and Matte Gold on a second, which turned out gorgeous! I adore the fact you get two for one techniques with the Press Plates, absolute genius.
To add color, I used the layering stencils and some of the newest ink colours. Sage and Eucalyptus for the greenery, and Berrylicious for the berries on one panel. Sage, Eucalyptus, Lush Forest and Mulberry Blush for the second.

I used the 1/2” blending brushes from Pinkfresh Studio too, they are brand new to me, but they are so easy to work with. The smaller brush heads are brilliant for the small spaces and to add details easily.

Both panels have been trimmed down a little bit and added to red card stock (the one with the Mulberry Blush inked berries) and the paler panel was adhered to Inca Gold mirror card stock from Tonic Studio.
The one with the red background panel also was decorated with some red gems for an extra red pop! These are from Pinkfresh Studio but are now discontinued but I’m sure many of us have them in our craft stash still.

I know this was short and sweet, but hopefully you have enjoyed it anyway and will be rearing to go to the next stop on the blog hop! Which is the one and only Heather Hoffman. The full lineup can be found via this inLinkz link and you can always start hopping from the Pinkfresh Studio blog post.
I have used some compensated affiliate links to the Pinkfresh Studio Shop in this post, at no extra cost to you whatsoever. If you click on these links and end up putting a little something-something in your shopping cart, and then press that ‘place order now’ button… I get a little commission directly from Pinkfresh as a thank you for sending you their way. This is one of the ways I make a little bit of money, and I appreciate the support and encouragement so much so THANK YOU if you shop using my links.
When this blog post goes live I will be frantically packing my things to fly home to Spain this evening. I’ve spent the last three weeks in the US, working the expo scene and teaching classes with Craft Meraki. I’m hoping I will be back at some point next year, so if you missed me this time, don’t worry, I will return.
Thank you for stopping by today, with love and light, sparkles and creativity,
Erica

INked Poppies + Dramatic colouring = Easy one layer card
Today we are going to have a look at the gorgeous Inked Poppies Press'n'Foil Plate. You might be wondering how we are going to create texture with water colouring, I am here to show you it can be done. It takes a little bit of bravery with your colouring, but the results speak for themselves.

The Inked Poppies press plate was released just this month and I'm sure I am not the only big fan of it. I do so happen to be a total floral-obsessed person so in my mind you can never have enough floral images. This one is a stunner though, the poppies cover an entire card front so you don't need much more than a sentiment and boom, you are done. That's the great upside of a floral image that really packs a punch, it takes so much guesswork out of the design elements.
I started out by getting all my BetterPress supplies ready: you will need the actual BetterPress platform (or a hot foil machine if you go the hot foil route) your choice of press plate and we are obvi going to use the Inked Poppies one, some ink, water colour paper, watercolours of your choice and a refillable watercolour brush. If you only get one of the three sizes available, I'd recommend going for medium.
I have gone for Karin Markers for this one, I love them, they are so vibrant and lovely to use. I don't have any of the Altenew Dual Tip Pens, but you had better believe I will add them to my stash as I'm currently in the US for the rest of this month. There are four fab sets to chose from and I like that each pack comes with a great colour combo! For the look I went with, the Islands of Fiji Brush & Fine Tip Pens would be the closest from the Altenew packs.

Once the whole thing has been inked up and run through the die cutting machine, we have a fabulous image to colour and colour we are going to do! Yes! We are going to go for a POP of colour too, and not one that can be found on poppies in nature. At least not that I have seen. I have a soft lavender/old pink large poppies in my garden, and they are lovely but colour wise we are aiming for yowza.

In the video you will see that I use a little acetate sheet over my BetterPress platform before adding the Poppies press plate and adding ink. The reason for this is because I am a total lunatic and don't like my platform to get stained. Yep, it's true and I am fully aware that it's bonkers to think that way, but I can't help it. Anyway... *glances away with a sheepish look on my face*
I actually ended up using a BetterPress ink for this, but I have tried a range of Altenew Crisp Dye Inks on various projects (see THIS POST for two examples) and they work great, so don't feel scared to experiment a little with the inks you have.
I explain why in the video, and I will quickly mention it here too. I wanted to try rubbing the ink pad over the poppies plate, rather than dabbing, because it just takes forever to get good coverage that way. Maybe because it's metal, as opposed to a photopolymer stamp? I didn't want to mess up any of my Altenew Crisp Dye inks so the BetterPress ink pad became the sacrificial lamb so to say. It works great and hasn't damaged the ink pad, and I have also seen Lydia do the same technique so we are good to go!

You will need a lot of patience (or a heat tool of some kind to speed up drying) but I promise the end result will be worth it. With the help of that watercolour brush and your choice of watercolours, we are going to start by adding a light colour wash all over the flowers and leaves. Different colours, mind you. This first layer does not have to be perfect, if anything, leaving some white space here and there on the poppies will help a lot with creating highlights and contrasts.
Each layer you do after this add more colour than the last one, and for one final dramatic touch, go direct to poppies with your marker. This part requires a bit of crafting bravery and a steady hand, but you can do it, I believe in you!

Like I said, the key is patience and a bit of bravery. Remember it's only paper, and if for whatever reason it doesn't turn out how you pictured it, you will learn something from it for next time. I'm sure you will reach for these gorgeous poppies over and over again!
PLEASE NOTE THE VIDEO IS NOT AVAILABLE YET DUE TO BEING OUTSMARTED BY TECHNOLOGY
In the video you will see a lot of the colouring, albeit a little bit sped up or we would be here all day. Sadly some of the footage, and of course it was the last part where I went direct to poppies with the markers for those delicious details, didn't film properly so that bit isn't shown in the video. If that's something you would like to see, please do drop me a comment here or on the video and let me know, and I will bear that in mind for future videos.
Poppies coloured and dried, it was time to move on to the next step: adding a sentiment and a touch of sparkle. Oh, ok, a generous sprinkling of sparkle! I didn't want to cover up the poppies too much so I stamped 'thank you for being so amazing' from the Sulfur Cosmos stamp set (another stunning floral set just released this month) with Permanent Black Ink on white card stock.
It made so much sense to use the Black Onyx Gem Sparkles for this card. It adds just the right amount of card drama! Plus they perfectly accessorise the poppies too, at least I think so. I contemplated using the Pink Turmaline Gem Sparklesas it comes with three beautiful shades of pink sparkles but after comparing them over the poppies, thanks to the clear acetate sheet they come on, I settled on the black ones.

For now I think that's enough jibber-jabbering for one day, but I really hope you have enjoyed this post, and get a chance to watch the video! If you watch it, I'd be delighted if you would leave me a comment over there on YouTube, or at least a thumbs up!
With love and light, creativity and sparkle!
Erica
Altenew & the minted Gardener collaboration!
Today I am so excited to be taking part in a fun Instagram hop celebrating a fabulous collaboration between Altenew and The Minted Gardener!
I have four cards to show, so I’m going to get right to it.
I adored the Warm & Fuzzy stamp set right away, and had a fun idea for it. I wanted to show that these images are not just great for water colouring, but also other techniques. The Artist Markers were my choice to add some colour, and I really love how it turned out.

Instead of using the markers to blend and create a smooth look with the Cherry Blossom Artist Markers set, I went for a dotty look. This technique helps create a bit of a 3 dimensional look.

The leaves and stems were blended a little bit, and these greens are from the A Set of the Artist Markers.
I left a huge amount of white space on this card, which I’m not normally very good with but this image is so lovely that it wasn’t as hard as it usually is. The panel was trimmed down a little and then I also cut off one of the corners at an angle.

The sentiment is from the Warm & Fuzzy stamp set and I stamped this on the actual card base, in black ink, and then popped up the coloured panel with some foam tape.
My second card is also using this stamp set, and with the same dotting technique, only in a rainbow and monochrome fashion.

The fluffy flowers are done with so many Artist Markers, from so many sets, to create that rainbow look. The leaves are done with grays to really let the colourful flowers pop and take centre stage!
I used the coordinating diecut for this to cut it out and then I layered it up with another two pieces to make it stand out.

This background I have made a bit graphic by stamping the image in black ink onto the card base directly. I used the StampWheel from Altenew, which made it a breeze to cover it.
The final thing to do was to stamp up HUGS on white card stock and cut that out with the coordinating diecut. This was then glued down, along with the flower, and with that the second card was done.

My third card is using the beautiful Peony & Lilac Swag set. It has a stamp set, a coordinating diecut and layering stencils. For this first card with this set I have used the layering stencils only for the florals, for a soft water colouring look.

This one I cut in half and added to a white background using my trusted and well-loved Layering Plaid Set B cover plate. I kept this one with lots of white space as well, which is so unusual for me. I don’t know what’s happening.
The sentiment is from the Peony & Lilac Swag stamp set, and I stamped it up with black ink on white card stock before trimming it down to a banner.

My fourth and final card is another CAS card! So much white space!! If I didn’t know I’m me, I would be worried I had been kidnapped and was trying to send a covert message for help, lol.

Here I have stamped the big floral image in black ink right in the middle of a card base. On a small piece of scrap paper I stamped the Spread Kindness sentiment in black ink and then heat embossed it in clear on top for a nice shiny look.
On top of this I ink blended a soft pastel rainbow for the ONLY pop of colour on this card. This is cut out using the coordinating diecut, and layered up with another two pieces to make it sturdy.

I added a few matte black sequins I got from a haberdashery, for a bit of interest but that was it. I’m so confused who this cardmaker is, it doesn’t feel like me but I wanted to really stretch myself outside of what I first thought I had to use with these products. I felt like I had to use water colours as The Minted Gardener uses water colours so well, but what kind of box was that to put myself in?

That’s all my cards done, so let’s get to the goodie bits!